After my foot surgery in April 2015, I went back to work on a large proposal, with lots of overtime, and moved into 2 more proposal projects that lasted through December, and then through June 2016. Then, I worked 80 hours a week through July and most of August on a new project. That's proposal life. I was barely able to keep up with family cards. So...I hope that my new project (not on deadline yet) will allow me to spend a little more creative time, and I can get my cardmaking and scrapping mojo back! I'll be posting catch up pix of my cards and projects over the last year, so stay tuned! Been missing blogging and sharing and seeing everyone's creative play!
-- Dawn
Wednesday, September 7, 2016

Bokeh Sympathy Cards
6/11/15
I'm still playing with the Bokeh cardstock background I made using Pear, Sweet Leaf and Topiary CTMH inks.
I made a few simple sympathy card using strips of that background. Not only am I still having fun with Bokeh, I seem to be using Gold heat embossing on everything, too. The gold scroll is Inkadinkadoo, the sentiment is JustRite Stampers, and the butterfly is Cloud Designs.

Thursday, April 16, 2015
Simple Sympathy
Sympathy cards are one thing that I need to have more of on hand. When the sad occasion occurs, I usually don't have the time to stop and make a card. So, last week while I created for family, I made a couple of extra cards to keep on hand. These are based on a simple idea I saw on Pinterest for creating a one layer card.
First, I cut a shape in the middle of a piece of scrap cardstock - any decorative shape will work. I used my Close to my Heart Artiste cartridge to cut a simple label shape as a stencil. I laid the stencil over the card base and stamped script in Slate ink. Then I set the card aside to dry.
I used the time to select an appropriate flower and sentiment. The Hero Arts "With Sympathy" set was perfect.
I changed each card a little, but for embossing, I used Versamark ink.
One card has the flowers and sentiment embossed in Hematite for a shimmery effect. One the other two, I used Detail Black embossing powder. And on the card in front, I wiped off the Versamark ink where the flowers were for the black embossing and came back later and inked only the flower areas and embossed them with Ranger Enchanted Gold powder.
The sentiments on those cards are embossed in Gold.
I punched out a butterfly from a K&Co. Paper in the Julianne stack. One card has the zip strip of CTMH Avonlea paper
I sponged around the flowers lightly with CTMH Buttercup ink, and around the sentiment on the other card with Tim Holtz Antique Linen distress ink.
For the final touch, I added a little shimmery gold ribbon.

Wednesday, April 15, 2015
Southern Sympathy
My dear Great Aunt passed away and I was unable to attend, but I made some beautiful sympathy cards for family members. These cards are truly from my heart.
 One of my favorite paper stacks is K&Co. Julianne paper. Since my relative lived in Mississippi, I chose the magnolia patterned paper in the stack.
I paired that with the coordinating striped patterned paper and used CTMH Indian Corn blue as a background layer.
Both the ivory (2-1/4") and blue (2-1/2") shapes were cut on the Cricut using the CTMH Art Philosophy cartridge.
I heat-embossed the border stamp (CTMH Frame It Up) with Stampendous Peridot embossing powder.
The sentiments on both
cards are from a Just Rite Stampers set, stamped on CTMH Colonial White
cardstock with CTMH Outdoor Denim ink.
 I added one flower cut out from a matching 6x6 pad. It was a bit of challenge to fussy-cut, but I perservered!
The second card has a paper flower as an embellishment. I used some Tim Holtz Distressing Ink (Antique Linen) to age it. The button is a CTMH button.
A little ribbon finished these cards beautifully.
Thank you for looking.
Sunday, March 15, 2015
Birthday Banner
The Twins' Disney Planes birthday party was great! I finished the birthday banner and the cupcake holders just in time. We had great weather and the boys were adorable. Hard to believe they are 2.
I used the CTMH Art Philosophy Cricut cartridge to cut the banner shapes and the stars with overlays. The banner shapes are cut at 7.5 Real Dial Size (RDS) from Orange cardstock, while the inner layer -- a gorgeous pearlescent blue -- was at 7.0 RDS.
CTMH used to sell a chipboard pennant set for use with the Art Philosophy cartridge; I used it on another banner. It's no longer available but since I used cardstock, I cut a "backing" piece out at 6.75 RDS. I just used some older blue plain cardstock that I won't be using on anything else. I found some pump spray adhesive (E6000) with low odor - what a find! It was so easy to spray it on the backing piece and adhere them. I made a spray booth out of a box and it worked out great. Since it is a liquid glue, the paper curled a bit, so I put all the pieces under a giant-size dictionary (yes, i am a word-nerd) for 24 hours to flatten them.
When adding the inner layer on the front, though, I smeared a bit the E6000 glue on the shimmery side of the first one so I switched to double-stick tape as I didn't want to chance messing up the remaining pennants.
The Hobby Lobby chipboard letters are painted with Acrylic paint. I tested the letters first by painting the "Q" to see if the color was better without a base coat or if I should coat them with white first. I liked the darker shade of paint on the chipboard for this project, but if one were to want a brighter color, the chipboard definitely need a base coat.
I cut the stars and overlays also with tge CTMH Art Philosophy cartridge. I had a big pile of stars and overlays...so note to self: stack them neatly keeping the shapes aligned at the top as they are cut. This will make it much easier to line up the overlays. I spent a LOT of time sorting stars and turning them so that I could find the exact fit. Who knew. But once I lined them up, I saved a ton of trimming time!
To adhere the letters I used Zots. Then I punched holes in each pennant and strung them on some royal blue twine that I had in my stash.
After the initial design phase of a project -- when I'm in my basement craft area -- it's usually just assembly that's left. I've started to do assembly work upstairs to be with my husband or watch our shows, yet still continue to work on projects.
I had the pennants lined up on the couch as I worked at the coffee table. I punched holes in each pennant and strung them on some royal blue twine from my stash.
I hung it up on our entertainment center to add ribbon between all the letters to keep them spaced appropriately.
It was a fun project and I know I'll be making more pennants in the future!


Tuesday, March 10, 2015
Planes Cupcakes
The cupcake decor is done! I found a Disney printable in a circle shape and punched it at 1.25". Then I punched a background circle from coordinating papers at 1.5". I ran all the circles through my 2.5" Xyron machine. I don't use it often, but it was made for a proect like this.
I adhered the layered circles to a scalloped circle with a toothpick sandwiched in-between. I've learned that it's nice to have more than 1 design to add interest, so I punched a few stars and adhered them to plain circles for some variety.
UPDATE: Adding a photo of the finished project. So cute!


Sunday, February 22, 2015
Flying High

I had such a fun time creating invitations for our twin great-grandsons Birthday Party!
Momma's theme was Disney Planes. I didn't have any Disney related stamping items, so I looked around Pinterest and found an invitation I could duplicate. My approach then centered on breaking it down into the different pieces I needed to put it all back together. It took a bit of computer work to get the pictures of Disney planes and the pilot wing banner.
Finding the orange and blue stripe paper proved more difficult but I
found a digital paper on Etsy. This was a new experience for me, but it worked out quite well. Once I found that suitable paper, I downloaded it and printed it onto white
cardstock, then trimmed it to the 5x7 invitation size.
For the center piece, I knew I could cut the fancy shape and layer it on the background. On the computer, I arranged all of the wording and pictures then printed it out onto white cardstock. Then I cut a shape using my CTMH Artiste Cricut cartridge. I cut it on scrap paper first, to find the correct position of the cut. Then I positioned the actual invitations one at a time on the mats to ensure the cuts came out correctly. Thank goodness it was only 15 cuts. Of course, I made a few more, because, as usual, I made some positioning mistakes!
I created the artwork on the wings and added the boy's names and then hand-trimmed them to lay on top of the white invitation layer. I spent 3 nights carefully trimming 15 of them while watching television.
I added a strip of dark orange behind the white invitation to make it stand out and then added the rest of the layers. 1st the strip of orange, then the white invitation layer, then the wings.
I added a strip of dark orange behind the white invitation to make it stand out and then added the rest of the layers. 1st the strip of orange, then the white invitation layer, then the wings.
I think they came out great and it was a lot of fun to create. I'll be working on cupcake toppers and a banner in the next week or so!
Wedding Invitations
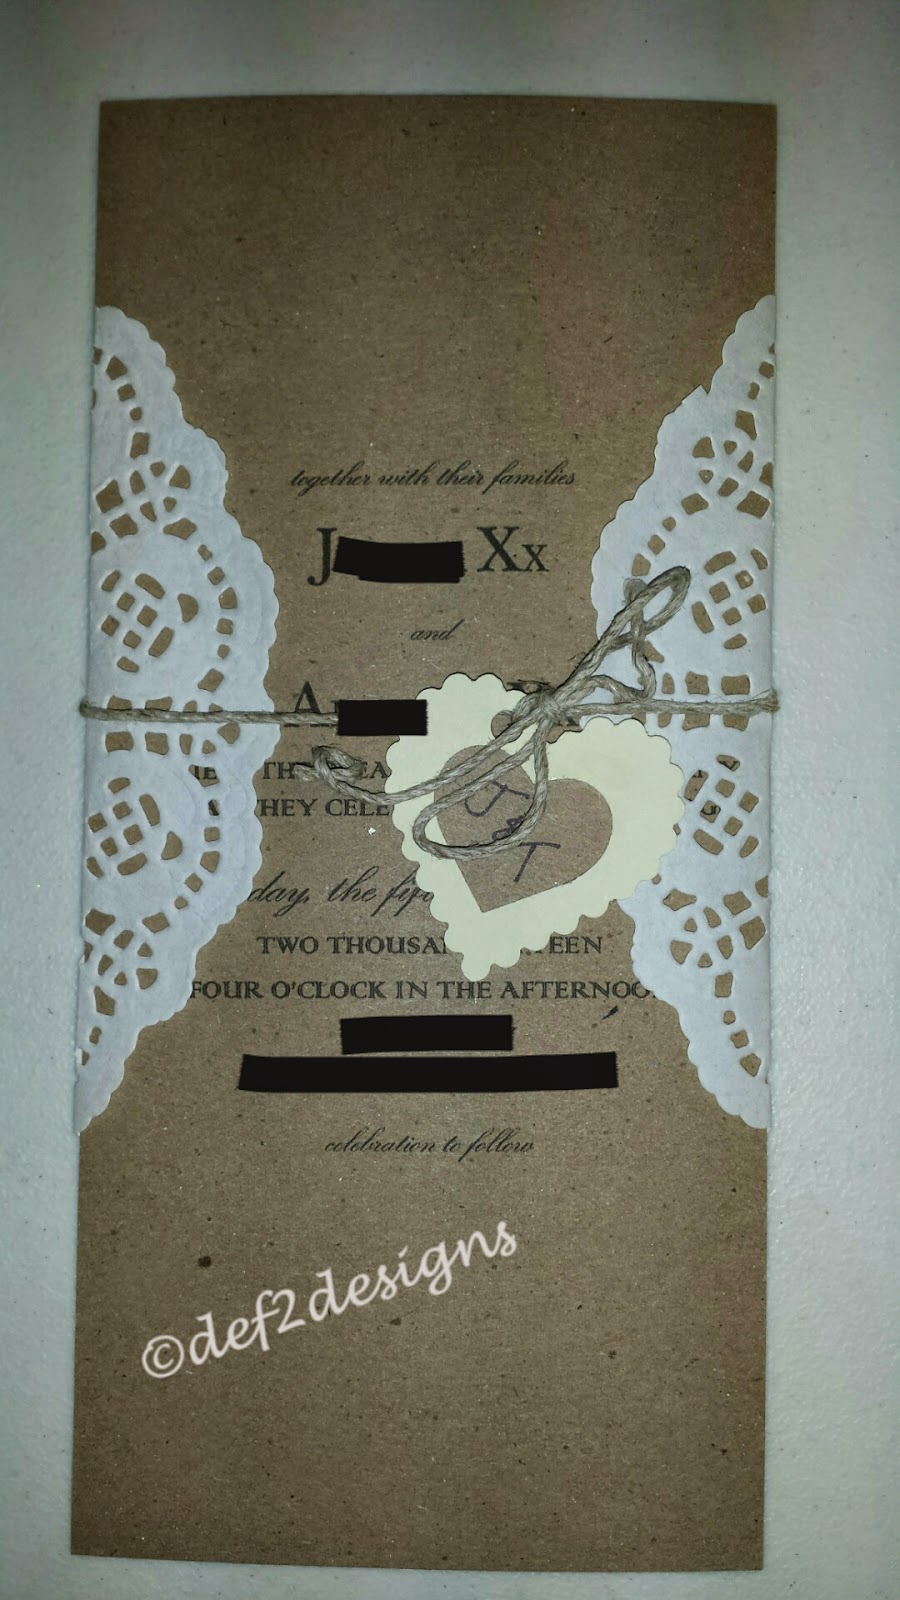
I was fortunate to be asked by a friend to create marriage celebration invitations with a nature theme. After looking on Pinterest, I decided on a craft background and printed the invitation information on the kraft card stock to create a few samples. They came over and picked their favorite.
 |
| Sample 1 |
 |
| Sample 2 |
Sample 1 was just printed with various typestyles and then stamped with wreath elements.
 |
| Sample 3 |
Sample 2 was a bit more involved (and would have been a lot of work to assemble 150+). I used a cream cardstock for the invitation and layered it on kraft, then added a gorgeous olive green burlap ribbon with a stamped and embossed leaf attached with hemp twine. This one was my personal favorite.
Sample 3 was sized for a #10 envelope, and some of the space above and below the doily was intended for stamping, but it didn't pass the first selection round. The doily was a card sleeve tied on with hemp twine and a scalloped heart punched tag. I think it was perhaps too girly for them.
The winning choice -- which I didn't get a picture of -- was a simple and clean look, which completely reflected their love of nature.
 |
| The final product. |
After printing the final invitations, reply cards and gift notes, I had them trimmed at Kinko's. That is completely worth the $2 per cut charge, as opposed to hand-trimming 150 invitations.
Three of us set up an assembly line for the final assembly. Each of us stamped 1 or 2 leaves [ Inkadinkado Stamping Gear Leaves] for the base layer, then set them aside to dry. Although the pattern looks random, we spent a lot of time deciding the color and placement of each leaf. We used CTMH Pear, English Ivy and Sweet Leaf inks, and Stampin' Up Old Olive ink. The first layer of ink must dry before embossing or else the embossing powder will adhere to any other wet ink and it will not be only on that portion of the design you want.
After a bit of drying time, we started the heat-embossing. One of us stamped the leaf, one added embossing powder, and one embossed. the assembly line made 200 invitations go very quickly. I printed enough copies to allow for mistakes. Which we definitely had. It was a lot of fun joking about who would receive the messed up invitations if we ran short.
We used Stampendous Peridot embossing powder. That color is one of my faves, and I only had 1/2 jar when I was making samples. I panicked at the thought of running out both in the midst of the project, and not having any left for my other projects, so I ordered 2 more jars online to make sure I had enough!
After completing the embossing, we started assembling the panels onto the cream cardstock, and again, the assembly line worked very well for us. I think we spent about 5 hours, and that included taking time out for a nice Italian meal delivered by a local restaurant!
The only other issue was stamping on the reply cards. I was stamping them off of the cardstock, which left ink residue on the scrap paper covering the stamping table. It imprinted on the postcard side of the reply card, resulting in a re-do of about 60 reply cards. It pays to have extras printed when you are adding hand-stamping! In the end, we had plenty!
Loved making this set for a dear friend!
See Ya Later
Alligator...
Alligator party that is.
 |
| See Ya Later, Alligator |
One of our friend's daughter is turning 1 and I made 12 invitations for her little party. Mom's theme was alligators because of her favorite stuffed animal. I found the perfect stamp in the Stampin' Up Wild About You set. I heat embossed the alligator, then stamped the flowers without embossing.
I paired that with some hot pink reptile skin paper, which I die cut using a scalloped rectangle Spellbinder. The base layer is from the DCWV Animal Crackers stack.
 |
| Glitter Glue on Die Cuts |
The 1's were cut on my Cricut.
They seemed pretty plain, so I coated them with orange glitter glue and let them dry. They proved to be fairly difficult to adhere because they curled. I used some heavy duty GlueDots to ensure they stuck down. One thing I can't stand is for my cards to fall apart in 6 months, so I am fairly picky about making sure the layers and embellishments are thoroughly attached.
 |
| Alligator Birthday |
The dark brown cardstock bases are a set of blank cards by Paper Studio. We printed the party information on white and adhered it inside the card.
I ended up with a cute set of party invitations that are not too girly and not too pink - exactly the effect desired.
Thanks for looking. See you later!


Anniversary
Our 27th anniversary. Again, by shopping my stash, I pulled together a look from a variety of manufacturers.
 This manly card began with CTMH Seaside papers. The ship is a Cape Arago stamp which I embossed with Chestnut embossing powder, and then watercolored around it with blue ink.
Many years ago, I showed those Cape Arago stamps to dear hubby while shopping online. He admired them and said, buy them, so I did! I try not make all his cards with ships, but they definitely come in handy for masculine cards.
I inked the sides of the ship panel, the basketweave paper, and the sentiment banner with Tim Holtz distressing ink in Walnut. I often forget to ink the sides of paper, and it really does make a difference in how the papers stand out from the background.
The little sentiment is a Rubber Soul stamp which I've been saving for a while just for this purpose!!! Twine is also a good masculine accent. I bought a large ball of hemp twine and use it quite often.
While we are discussing masculine cards...another theme is trains...
I didn't post last year's anniversary card which was also a hit with hubby! He loves trains, and they are a good focal point for any masculine card.
This one used Tim Holtz stamps from Stampers Anonymous, Here and There. The railroad crossing and the train itself.
 The paper is in a 6x6 pad, 7gypsies, Venice. The design could be adapted to any masculine papers in your stash! Banners are easy, and help use up scraps, too. You can see that I didn't ink the edges of these banners, and I think it would have looked better with the edges inked. My handy hemp twine and a button finished this card nicely.
 Sympathy

I needed a sympathy card for our friend and fellow hunter's passing and I dislike flowery sympathy cards.
I combined stamps from Tim Holtz Flights of Fancy and Nature's Elements in yellow tones (a mix of CTMH and Stampin' Up inks).
The dry embossed layer is a basket weave pattern.
The sentiment is from the Our Daily Bread "With Heartfelt Sympathy" set.
I did go with ribbon, but didn't add a bow, as I like to do. Simple seemed better for this card.
Any passing of a friend or family member is an unfortunate time, and I really need to get better at making some Sympathy cards to have on hand. I find when I need one, it's unexpected, and I just don't have a day or two to create.
Fall Birthday Cards
September/October 2014
I made a couple of awesome cards for my Father and Stepmother's birthdays.
 |
| Dad's Birthday Card 2014 |
For my father I selected some Tim Holtz stamps. And crafted a card that completely resounded with him! The dial reminded him of the tools used back in the day, and his family had a car just like the one on the card. Interestingly, I started with a MojoMonday sketch, and meant to do something completely different, but this one just fell together. I think there was some serendipity going on!
The background is a steel plate embossing folder. Considering the car subject matter, I thought that was appropriate.
The dial and car are both from the Tim Holtz collection. The dial is from Road Trip and the car is from Here & There.
The arrow is a CTMH arrow, and I put a little tiny Number 1 shield in from the CTMH 30 Years of Happy set.
The gear is one of those happy finds from A Creating Keepsakes convention that was still in my stash!
 |
| Mom's Birthday Card 2014 |
Mom's card is simple yet elegant. She loves butterflies so I cut a butterfly using my Close to My Heart Artiste cartridge on the Cricut. The
I used a ~4" doily and found some beautiful floral paper by Meg's Garden (it was in my stash). It was in a 6x6 pad called Romantic Garden. I trimmed the paper to fit inside the Doily.
The sentiment is in the JustRite Stampers Birthday Sentiments set.
I noticed that I am getting stripes on some of my photos from the fluorescent lighting in my craft area -- they are not on the paper, so just look past that.
I love being able to pull together any look from all different manufacturers and have it all come together.
Thank you for looking & happy stamping!
Tuesday, February 17, 2015
Life Gets Busy - Happy 2015
 |
| Snow, the woodpile, the outhouse, and the shed |
 |
| Unfinished Kitchen area - still functional! |
 |
| Deer on our road |
As I posted during my thankfulness postings, I did get a couple of days of quiet crafting time to work on some cards.
Thanks for still being out there with me!
Monday, December 1, 2014
Day #30
Most of my posts are about family and being in the country. This gratefulness blogging is at an end for 2014. I think this year I've noticed how much more my family means to me. We take every opportunity we can to spend time with family. And the same with our friends. And I am grateful for our opportunity to have Clayhille. It just brings home how much I enjoy being outdoors. Today I sat in my stand for doe season and it was windy and cold and I didn't see any deer. But I did get to see a bald eagle circling in the clearing over my stand and that made it all worthwhile. Not everyone gets to see such a beautiful sight. A wonderful way to wrap up my gratefulness diary.
Day 29
We're nearing the end of my exercise. Today I am grateful for the time spent on a beautiful day with grandsons after Codi and a friend were successful at Doe Season (from my stand). We all worked together to get the butchering done. Venison in the cooler!
Friday, November 28, 2014
Grateful Day 28
Grateful we can spend another weekend at the cabin for doe season! 1/2 moon...grandson has a roaring campfire, woodstove cranking the heat, and I'm thankful for chili dogs with ALL the fixin's. Life is good!
Grateful Day 27
On Thanksgiving, I am grateful to God for my family and that I was able to spend a happy day with stepchildren and grandchildren and great-grandsons, as well as my sis and her family! Fun and Food! It was great!
Day 26
Grateful for my families that are not "family". We are privileged to spend many good times with them and be part of their families. Love them all!!!
Day 25
Grateful for my Dad and stepmother. They are always there for me to provide love and support! Just what I need! LOVE THEM!
Monday, November 24, 2014
Grateful Day 24
Thankful for a job with paid vacation! I get to catch up from our real vacation. ..loads of laundry and time to get it done! 2 loads are already done and folded...and another 1 is in dryer and 1 in the washer. Whew!!!

Subscribe to:
Posts (Atom)